Sealing granite countertops takes about 30 minutes of hands-on work plus 24–48 hours of cure time, and most kitchens need it only once every 3 to 5+ years with a quality modern penetrating sealer — not annually, as older guidance says. The water-drop test tells you when. After 10 years sealing granite on customer installs, here’s the full guide: how sealing actually works, the water-drop test that determines whether you even need to do it, the step-by-step process, the products worth buying, and the answer to whether your granite was sealed at install.
Was Your Granite Sealed When Installed?
Almost always yes. Reputable fabricators seal granite before delivery as standard practice — ask your fabricator to confirm. That initial seal typically protects for 3 to 5+ years on most stones, sometimes longer. Don’t assume you need to reseal a brand-new countertop; you usually don’t. Run the water test instead.
The Water-Drop Test: Do You Even Need to Seal?
The most important step in this entire guide is the test that tells you whether to bother. Pour about 1/4 cup of water on a dry section of countertop and watch:
- Water beads up tightly and sits 10+ minutes without darkening the stone → seal is intact. Don’t reseal.
- Water flattens but doesn’t darken the stone within 5–10 minutes → seal is fading. Plan to reseal in the next month or two.
- Water darkens the stone within 1–5 minutes → seal has failed. Reseal now, before a real spill stains the surface.
Modern penetrating sealers genuinely last years. Don’t reseal on a calendar; reseal when the test fails. Test every 12 months as a check. Many dense dark granites barely need sealing at all.
Is Sealing Granite Necessary?
For most granites, yes — granite is naturally porous and unsealed stone absorbs oil, wine, coffee, and other stains that can be permanent. But “necessary” depends on the specific stone. Dense dark granites (Absolute Black, Tan Brown) are tight enough that they sometimes barely need sealing at all. Lighter, more porous granites (White Ice, Colonial White) absorb readily and need attentive sealing. The water test is the deciding factor; your specific stone tells you what it needs.
How Granite Sealer Works
A quality granite sealer is a penetrating impregnating sealer, the format recommended by the Natural Stone Institute. It soaks into granite’s tiny pores and bonds chemically with the stone, leaving the appearance and finish unchanged while filling the absorbent capillaries from the inside. Liquids spilled on a sealed surface bead up and sit on top, giving you the cleanup window you need to wipe before staining occurs.
The other category of sealer — topical sealers that form a film on the surface — should be avoided on granite. Topical sealers can make the stone look glossy or wet, but they scratch, dull, peel at the edges, and require stripping before resealing. Penetrating is the correct choice. See my best granite sealer guide for product recommendations.
How to Seal Granite Countertops: Step-by-Step
Step 1: Confirm Sealing Is Needed (Water Test)
Skip this and you may seal a countertop that doesn’t need it. Run the water test described above first.
Step 2: Clear and Clean the Surface
Remove everything from the counter. Clean with warm water and a few drops of pH-neutral dish soap (Dawn works) using a microfiber cloth. Never use vinegar, lemon, bleach, or ammonia-based cleaners — they degrade granite finish and interfere with sealer absorption.
Step 3: Let the Stone Dry Completely
This is the step most homeowners shortcut and the one that causes most sealer failures. The granite must be dry through its porous structure, not just on the surface. Wait at least 4–6 hours, ideally overnight. Run a kitchen fan to help. Moisture trapped in the pores prevents the sealer from penetrating and leaves it sitting on top to dry into a cloudy film.
Step 4: Test the Sealer in a Hidden Spot
Before doing the whole counter, apply the sealer to an inconspicuous area (under an appliance or behind the sink) and watch for any color change, hazing, or unexpected reaction. Five minutes of testing prevents a much larger problem. Quality penetrating sealers shouldn’t change the appearance.
Step 5: Apply the Sealer
In a well-ventilated kitchen, pour or spray the sealer onto a clean lint-free microfiber cloth and work it into the granite in circular motions, covering the entire surface evenly. Apply a generous coat — you want the stone to absorb sealer, not just have some smeared on top.
Step 6: Let It Dwell
Allow the sealer to soak into the stone for the time the product directs — usually 2–15 minutes. During this window, the sealer is penetrating into the pores. Reapply sealer to any spot that fully absorbs early (porous areas).
Step 7: Wipe Off ALL Excess Before It Cures
Critical: before the dwell window ends, use a clean dry microfiber to wipe off every trace of excess sealer from the surface. Sealer left to cure on top of granite creates a hazy film that’s hard to remove. Buff dry until the surface looks the same as before sealing.
Step 8: Apply a Second Coat If Needed
Lighter, more porous granites often need two coats. Wait the manufacturer’s recommended interval between coats (usually 30 minutes to an hour), then repeat the process. Dense dark stones often need only one.
Step 9: Cure
Don’t use the countertop for 24–48 hours minimum. No spills, no cooking, no water. The chemistry needs the full window to complete the bond. Some premium sealers call for up to 72 hours; follow the specific product.
Step 10: Re-Test After Curing
After full cure, run the water test again. Water should bead tightly. If it doesn’t, apply another coat using the same procedure.
Recommended Granite Sealers
The penetrating sealers I’d put on a customer job, briefly:
- Miracle Sealants 511 Impregnator — long-standing fabricator standard. The default pick.
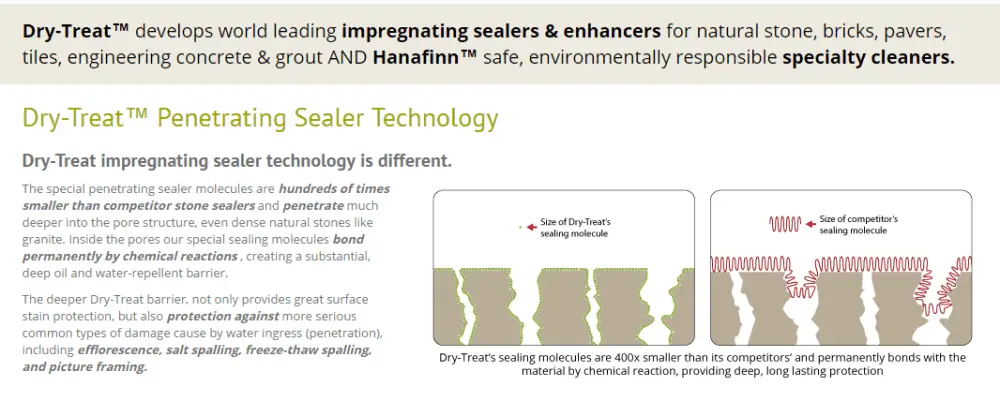
- MORE Premium Stone Sealer (formerly Dry-Treat) — longest-lasting; the premium long-hold pick.
- Tuff Duck Granite Sealer — the budget pick that genuinely performs.
For the full comparison of 8 products by use case, see my best granite sealer guide.
DIY vs. Hiring a Professional
For most homeowners, sealing granite is genuinely DIY-friendly — about 30 minutes of work, no specialized tools. The professional route ($200–$350 for an average kitchen, see my cost-to-reseal guide) makes sense for very large or complex installations, exotic high-value granite where you want zero risk, or homeowners who’d rather not do it. Otherwise DIY saves $100–$250 for what is honestly an easy task if you follow the steps above.
How Often Should You Reseal?
Modern penetrating sealers last 3 to 5+ years on most granite, sometimes much longer with premium products like MORE/Dry-Treat. The old “reseal every year” advice is outdated. The water-drop test — described in Bob Vila’s granite sealing guide and used by professional fabricators — is the deciding factor. Check once a year and reseal only when it fails. Some homeowners go a decade between resealings on dense dark stones.
What Happens If You Don’t Seal Granite?
Unsealed or under-sealed granite gradually develops oil stains under cooking-oil bottles, ring marks from coffee cups, and dulling in heavily-used prep areas as porous granite absorbs from below. The damage is often permanent because the stains soak into the stone. Resealing is cheap insurance ($50–$100 in materials) against ruining a countertop that cost thousands.
Can Granite Be Sealed “Permanently”?
Not in the strict sense, but premium long-life sealers like MORE Premium Stone Sealer (Dry-Treat) come close — properly applied, they can protect for 10–15+ years, longer than many homeowners hold a kitchen. The “permanent seal” marketing claim is overstated, but a premium sealer correctly applied genuinely is a near-set-and-forget choice for the practical lifetime of the kitchen.
Does Black Granite Need Sealing?
Often no — or much less than lighter granites. Dense dark granites like Absolute Black are tight enough that water barely penetrates. Test with the water-drop method; if water beads up and sits 30+ minutes without darkening the stone, your black granite likely doesn’t need sealing at all. Some dark granites have never been sealed in service and show no problems.
Frequently Asked Questions
How do you seal granite countertops?
Clean and fully dry the surface, test the sealer in a hidden spot, apply an even coat with a microfiber cloth, let it dwell 2–15 minutes per the product directions, wipe off all excess before it cures, apply a second coat if needed, and let cure 24–48 hours before normal use. Run the water-drop test first to confirm sealing is actually needed.
How often should granite be sealed?
Test with the water-drop method rather than following a calendar. Modern sealers last 3 to 5+ years on most granite; dense dark stones may need it even less often. Check every 12 months but only reseal when water stops beading.
What is the best sealer for granite countertops?
Miracle Sealants 511 Impregnator for most kitchens (long-standing fabricator standard). MORE Premium Stone Sealer (formerly Dry-Treat) for maximum longevity. Tuff Duck for budget. See my best granite sealer guide for a full ranked comparison.
How long does granite sealer take to dry?
Touch-dry within an hour, fully cured at 24–48 hours. Keep the counter dry and unused for the full cure window — using it too early prevents the chemistry from completing.
Was my granite sealed when installed?
Almost always yes — reputable fabricators seal granite before delivery as standard practice. The initial seal typically lasts 3 to 5+ years. Run the water test on a new install to confirm; don’t reseal a brand-new countertop unless the test says you need to.